- model1 / model2
- MVC
- SingleTon
- ...
- 프레임워크 - 라이브러리
- 스프링(자바에서 대형 어플리케이션을 만들때 효율적임)
- ...
스프링
https://spring.io/
전자정부 프레임워크
http://www.egovframe.go.kr/
- 스프링 버전이 낮음, 프로젝트 구성 오픈소스 버전이 낮음
세팅
spring 폴더를 만들고, eclipse와 tomcat-apache을 새로 받음
서버를 아파치8로 설정해줌
eclipse market place에서 sts검색
설치완료하면 spring 아이콘 생김
property에 spring생김
DI (Dependency Injection) 의존성 주입
- 클래스간의 관계를 xml 중심으로 기술 방법
- 클래스간의 관계를 xml이 만들어줌
- 수동 다운로드 받아서
- 전용다운로드 툴을 사용하는 방법 maven / gradle
Spring 프로젝트 폴더 만듦
스프링 라이브러리 추가
자바폴더와 스프링 폴더가 J, S 마크로 구분됨1. 스프링으로 간단하게 hello 프로젝트 만들기
폴더구조
HelloSpring.java 클래스 만듦
package spring;

public class HelloSpring {
	public void sayHello(String name){
		System.out.println(name + "님 안녕하세요");
	}
}
context.xml Bean 만듦
<?xml version="1.0" encoding="UTF-8"?>
<beans xmlns="http://www.springframework.org/schema/beans"
    xmlns:xsi="http://www.w3.org/2001/XMLSchema-instance"
    xsi:schemaLocation="http://www.springframework.org/schema/beans http://www.springframework.org/schema/beans/spring-beans.xsd">

    <bean name="helloBean" class="spring.HelloSpring" />

</beans>
HelloSpringMain.java 메인 클래스 만듦
package spring;

import org.springframework.beans.factory.BeanFactory;
import org.springframework.beans.factory.xml.XmlBeanFactory;
import org.springframework.core.io.ClassPathResource;
import org.springframework.core.io.Resource;

public class HelloSpringMain {

	public static void main(String[] args) {
		// context bean 경로 설정
		Resource resource = new ClassPathResource("spring/context.xml");
		//HelloSpring instance 과정이 없어짐
		BeanFactory beanFactory = new XmlBeanFactory(resource);

		HelloSpring helloSpring = (HelloSpring)beanFactory.getBean("helloBean");
		helloSpring.sayHello("홍길동");
	}

}
HelloSpring.java & HelloSpringMain.java 둘의 관계를 context.xml이 만들어줌
2. 똑같은거 자바프로젝트와 비교
자파프로젝트 폴더구조
HelloSpring.java
package springEx01;

public class HelloSpring {
	public void sayHello(String name){
		System.out.println(name + "님 안녕하세요");
	}
}
HelloSpringMain.java
package springEx01;

public class HelloSpringMain {

	public static void main(String[] args) {
		// TODO Auto-generated method stub
		HelloSpring helloSpring = new HelloSpring();
		helloSpring.sayHello("홍길동");
	}

}
3. Bean.xml 을 부르는 두번쨰 방법 (현재 많이 사용)
HelloSpring.java
package spring;

public class HelloSpring {
	public void sayHello(String name){
		System.out.println(name + "님 안녕하세요");
	}
}
context.xml
<?xml version="1.0" encoding="UTF-8"?>
<beans xmlns="http://www.springframework.org/schema/beans"
    xmlns:xsi="http://www.w3.org/2001/XMLSchema-instance"
    xsi:schemaLocation="http://www.springframework.org/schema/beans http://www.springframework.org/schema/beans/spring-beans.xsd">

    <bean name="helloBean1" class="spring.HelloSpring" /><!-- name 메인에서 사용할 이름 class 실제클레스명 -->
    <bean id="helloBean2" class="spring.HelloSpring" /><!-- id : name과 역할 같음 -->

</beans>
HelloSpringMain2.java
package spring;

import org.springframework.context.support.GenericXmlApplicationContext;

public class HelloSpringMain2 {

	public static void main(String[] args) {
		//현재 xml가져오는 방법
		GenericXmlApplicationContext ctx = new GenericXmlApplicationContext("classpath:spring/context.xml");
		//XmlBeanFactory는 퇴출됨
		//BeanFactory beanFactory = new XmlBeanFactory(resource);

		//HelloSpring helloSpring = (HelloSpring)ctx.getBean("helloBean2");
		HelloSpring helloSpring = (HelloSpring)ctx.getBean("helloBean2", HelloSpring.class);
		helloSpring.sayHello("홍길동");

		ctx.close(); //ctx 닫아주는게 좋음
	}

}
4. 원격으로 라이브러리 받는 프로젝트 만들기
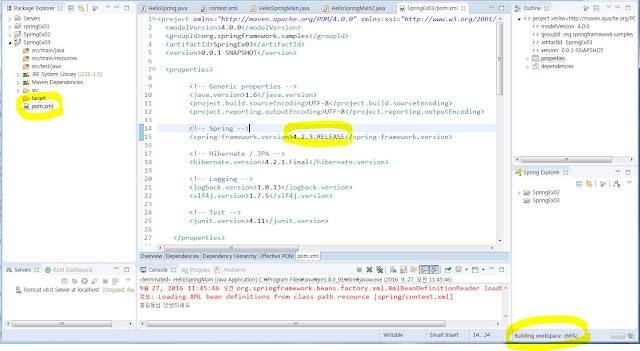
프로젝트 maven 만듦
폴더 아이콘에 M이 생김
porn.xml 에서 프로젝트 버전 관리를 할 수있음 버전을 높이면 자동적으로 원격에서 다운로드가 일어남
HelloSpring.java
package spring;

public class HelloSpring {
	public void sayHello(String name){
		System.out.println(name + "님 안녕하세요");
	}
}
context.xml 만들기
<?xml version="1.0" encoding="UTF-8"?>
<beans xmlns="http://www.springframework.org/schema/beans"
    xmlns:xsi="http://www.w3.org/2001/XMLSchema-instance"
    xsi:schemaLocation="http://www.springframework.org/schema/beans http://www.springframework.org/schema/beans/spring-beans-4.1.xsd">

    <bean id="helloBean" class="spring.HelloSpring" />

</beans>
HelloSpringMain.java
package spring;

import org.springframework.context.support.GenericXmlApplicationContext;

public class HelloSpringMain {

	public static void main(String[] args) {
		// TODO Auto-generated method stub
		GenericXmlApplicationContext ctx = new GenericXmlApplicationContext("classpath:spring/context.xml");

		HelloSpring helloSpring = (HelloSpring)ctx.getBean("helloBean", HelloSpring.class);
		helloSpring.sayHello("홍길동");

		ctx.close();
	}

}
5. 인터페이스를 통한 구현
폴더구조
HelloSpringInter.java 인터페이스 만들기
package spring2;

public interface HelloSpringInter {
	public abstract void sayHello(String name);
}
HelloSpring1.java 메소드 클래스 인터페이스 상속받아서 완성함
package spring2;

public class HelloSpring1 implements HelloSpringInter {

	public HelloSpring1() {
		// 함수호출보다 먼저 처리할 것을 생성자에 넣음
		System.out.println("생성자 호출 1");
	}

	@Override
	public void sayHello(String name) {
		System.out.println("안녕 " + name);
	}

}
HelloSpring2.java 메소드 클래스 인터페이스 상속받아서 완성함
package spring2;

public class HelloSpring2 implements HelloSpringInter {

	public HelloSpring2() {
		// 함수호출보다 먼저 처리할 것을 생성자에 넣음
		System.out.println("생성자 호출 2");
	}

	@Override
	public void sayHello(String name) {
		System.out.println("Hello " + name);
	}

}
context.xml
<?xml version="1.0" encoding="UTF-8"?>
<beans xmlns="http://www.springframework.org/schema/beans"
    xmlns:xsi="http://www.w3.org/2001/XMLSchema-instance"
    xsi:schemaLocation="http://www.springframework.org/schema/beans http://www.springframework.org/schema/beans/spring-beans-4.2.xsd">

    <bean id="helloBean1" class="spring2.HelloSpring1"></bean>
    <bean id="helloBean2" class="spring2.HelloSpring2"></bean>
</beans>
HelloSpringMain.java
package spring2;

import org.springframework.context.support.GenericXmlApplicationContext;

public class HelloSpringMain {

	public static void main(String[] args) {
		// TODO Auto-generated method stub
		GenericXmlApplicationContext ctx = new GenericXmlApplicationContext("classpath:spring2/context.xml");

		HelloSpringInter hello = (HelloSpringInter)ctx.getBean("helloBean1");
		hello.sayHello("홍길동");

		hello = (HelloSpringInter)ctx.getBean("helloBean2");
		hello.sayHello("박문수");
	}

}


댓글 없음:
댓글 쓰기