2016년 7월 19일 화요일

02day HTML & CSS

1. element selector
<!doctype html>
<html>
<head>
    <meta charset = "utf - 8" />
    <style type="text/css">
    /*주석*/
    /*element(tag) select */
    /*{속성, 값}, ; 값의 구분    */
    /*color : foreground => 글자색*/
    /*background => 배경색*/
    p {color: red; background: blue;}
    div {color: blue;}
    </style>
</head>
<body>
    <p>Hello css1</p>
    <div>middlle</div>
    <p>Hello css1</p>
    <div>middlle</div>
    <p>Hello css1</p>
    <div>middlle</div>
</body>
</html>

2. class selector

<!doctype html>
<html>
<head>
    <meta charset = "utf - 8" />
    <style type="text/css">
    .p1 {color: red;}
    .p2 {color: blue;}
    .p3 {color: green;}
    </style>
</head>
<body>
    <p class = "p1">Hello css1</p>
    <div class = "p1">middlle</div>
    <p class = "p2">Hello css1</p>
    <div class = "p2">middlle</div>
    <p class = "p3">Hello css1</p>
    <div class = "p3">middlle</div>
</body>
</html>

<!doctype html>
<html>
<head>
    <meta charset = "utf - 8" />
    <style type="text/css">
    /*.p1 {color: red;}
    .p2 {color: blue;}
    .p3 {color: green;}*/

    /*p태그중에 p1태그를 구분하고 싶을때*/
    p.p1 {color: red;}
    div.p1 {color: blue;}
    </style>
</head>
<body>
    <p class = "p1">Hello css1</p>
    <div class = "p1">middlle</div>
    <p class = "p2">Hello css1</p>
    <div class = "p2">middlle</div>
    <p class = "p3">Hello css1</p>
    <div class = "p3">middlle</div>
</body>
</html>

3. id selector
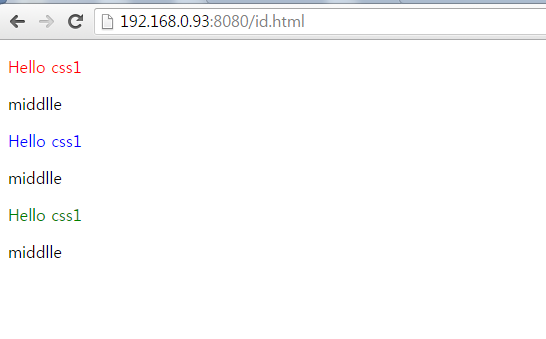
<!doctype html>
<html>
<head>
    <meta charset = "utf - 8" />
    <style type="text/css">
    /*정확히 하나의 태그에 접근할 때 id Selector*/
    #i1 {color: red;}
    #i3 {color: blue;}
    #i5 {color: green;}
    </style>
</head>
<body>
    <p id = "i1">Hello css1</p>
    <div id = "i2">middlle</div>
    <p id = "i3">Hello css1</p>
    <div id = "i4">middlle</div>
    <p id = "i5">Hello css1</p>
    <div id = "i6">middlle</div>
</body>
</html>

4
<!doctype html>
<html>
<head>
    <meta charset = "utf - 8" />
    <style type="text/css">
    /*공통적인 적용일 때 grouping Selector*/
    #i1, #i2, #i3 {color: blue;}
    </style>
</head>
<body>
    <p id = "i1">Hello css1</p>
    <div id = "i2">middlle</div>
    <p id = "i3">Hello css1</p>
    <div id = "i4">middlle</div>
    <p id = "i5">Hello css1</p>
    <div id = "i6">middlle</div>
</body>
</html>


5. decendent selector
<!doctype html>
<html>
<head>
    <meta charset = "utf - 8" />
    <style type="text/css">
    div p {background: yellow;} /*자손 모두를 선택*/
    /*div > p {background: yellow;}*/

    </style>
</head>
<body>
    <p>css 1</p>
    <p>css 2</p>
    
    <div>
        <p>css 3</p>
        <p>css 4</p>
        <span>
            <p>css 5</p>
            <p>css 6</p>
        </span>
    </div>

    <p>css 7</p>
    <p>css 8</p>
</body>
</html>


6. child selector
<!doctype html>
<html>
<head>
    <meta charset = "utf - 8" />
    <style type="text/css">
    /*div p {background: yellow;}*/
    div > p {background: yellow;} /*직접 자식 선택*/

    </style>
</head>
<body>
    <p>css 1</p>
    <p>css 2</p>
    
    <div>
        <p>css 3</p>
        <p>css 4</p>
        <span>
            <p>css 5</p>
            <p>css 6</p>
        </span>
    </div>

    <p>css 7</p>
    <p>css 8</p>
</body>
</html>


7. Adjacent Sibling Selector
<!doctype html>
<html>
<head>
    <meta charset = "utf - 8" />
    <style type="text/css">
    div + p {background: yellow;} /*가장 가까운 형제 하나 선택*/
    /*div ~ p {background: yellow;}*/
    </style>
</head>
<body>
    <p>css 1</p>
    <p>css 2</p>
    
    <div>
        <p>css 3</p>
        <p>css 4</p>
        <span>
            <p>css 5</p>
            <p>css 6</p>
        </span>
    </div>

    <p>css 7</p>
    <p>css 8</p>
</body>
</html>


8. General Sibling Selector
<!doctype html>
<html>
<head>
    <meta charset = "utf - 8" />
    <style type="text/css">
    /*div + p {background: yellow;}*/
    div ~ p {background: yellow;} /*형제 선택*/
    </style>
</head>
<body>
    <p>css 1</p>
    <p>css 2</p>
    
    <div>
        <p>css 3</p>
        <p>css 4</p>
        <span>
            <p>css 5</p>
            <p>css 6</p>
        </span>
    </div>

    <p>css 7</p>
    <p>css 8</p>
</body>
</html>


9. pseudo_classes
<!doctype html>
<html>
<head>
    <meta charset = "utf-8" />
    <style type="text/css">
        a:link {color: #ff0000;} /*링크가 걸려있을 때 색깔*/
        a:visited {color: #00ff00;} /*방분 했을 때*/
        a:hover {color: #ff00ff;} /*마우스를 올렸을 때*/
        a:active {color: #0000ff;} /*마우스를 클릭하고있는 상태일 때*/
    </style>
</head>
<body>
    <a href="http://m.naver.com">모바일 네이버</a>
</body>
</html>


10.pseudo_classes
<!doctype html>
<html>
<head>
    <meta charset = "utf-8" />
    <style type="text/css">
        p:first-child {background: yellow;} /*p태그의 첫번째 자식*/
        p:last-child {background: red;} /*p태그의 마지막 자식*/
        p:nth-child(3) {background: blue;} /*p태그의 n번쨰 자식*/
        p:nth-child(2n) {background: pink;} /*p태그의 수열(2n)번쨰 자식*/
    </style>
</head>
<body>
    <p>Hello CSS</p>
    <p>Hello CSS</p>
    <p>Hello CSS</p>
    <p>Hello CSS</p>
    <p>Hello CSS</p>
    <p>Hello CSS</p>
    <p>Hello CSS</p>
</body>
</html>

11. CSS colors
색상값을 주는 법 3가지
  • a valid color name - like "red"
  • an RGB value - like "rgb(255, 0, 0)"
  • a HEX value - like "#ff0000"
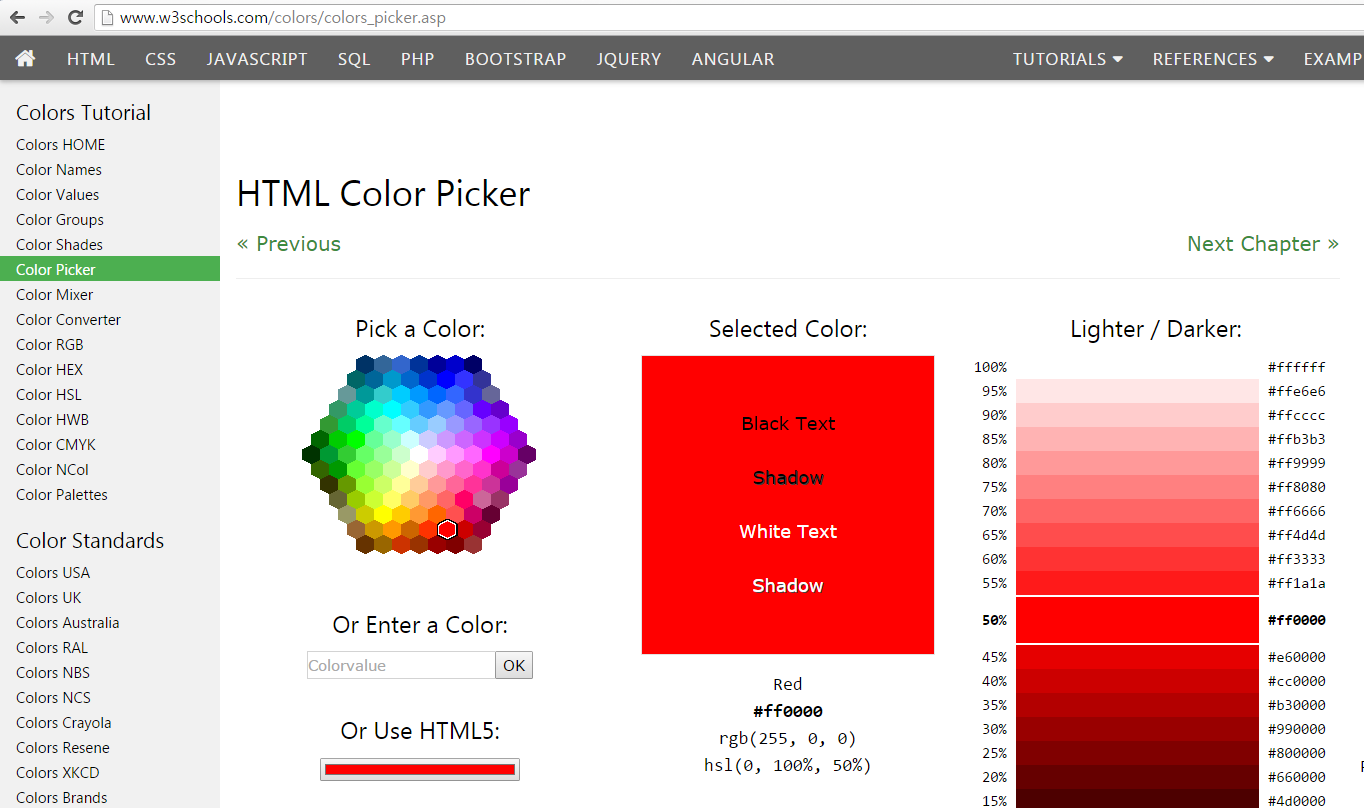
컬러 픽커 : http://www.w3schools.com/colors/colors_picker.asp


12. background


<!doctype html>
<html>
<head>
    <meta charset = "utf-8" />
    <style type="text/css">
        body {background-image: url('background.gif');} /*배경이미지의 기본은 반복*/
    </style>
</head>
<body>
    
</body>
</html>

<!doctype html>
<html>
<head>
    <meta charset = "utf-8" />
    <style type="text/css">
        /*배경은 table, tr, td 등등에도 적용이 가능함*/
        tr:first-child {background-image: url('background.gif');}
    </style>
</head>
<body>
    <table width="700" height="300" border="1">
        <tr>
            <td>내용</td>
            <td>내용</td>
            <td>내용</td>
        </tr>
        <tr>
            <td>내용</td>
            <td>내용</td>
            <td>내용</td>
        </tr>
    </table>
</body>
</html>

<!doctype html>
<html>
<head>
    <meta charset = "utf-8" />
    <style type="text/css">
        /*배경은 table, tr, td 등등에도 적용이 가능함*/
        table {
            background-image: url('background.gif');
            /*background-repeat: repeat-y; y축으로만 반복*/
            background-repeat: no-repeat; /*반복안함*/
            background-position: right top; /*이미지 위치지정*/
        }
    </style>
</head>
<body>
    <table width="700" height="300" border="1">
        <tr>
            <td>내용</td>
            <td>내용</td>
            <td>내용</td>
        </tr>
        <tr>
            <td>내용</td>
            <td>내용</td>
            <td>내용</td>
        </tr>
    </table>
</body>
</html>


13. attribute selector
<!doctype html>
<html>
<head>
    <meta charset = "utf-8" />
    <style type="text/css">
        /*태그의 속성을 선택함 attribute selector*/
        a[target=_blank] {background: yellow;}
    </style>
</head>
<body>
    <a href="http://m.naver.com">네이버</a><br />
    <a href="http://m.naver.com" target="_blank">네이버</a><br />
    <a href="http://m.naver.com" target="_top">네이버</a><br />
</body>
</html>

**정규표현식 처럼 문자 일부를 가지고 찾을 수 있는 기능이 있음
[title~="flower"] : 해당 단어를 정확히 포함 (flowers,new-flower [x])
[class^="top"] : 속성값이 해당 단어로 시작
...
http://www.w3schools.com/css/css_attribute_selectors.asp

14. text
<!doctype html>
<html>
<head>
    <meta charset = "utf-8" />
    <style type="text/css">
        h1 {
            text-align: center;   /*정렬*/
            text-decoration: overline; /*강조 라인*/
            text-transform: uppercase; /* 대문자 */
            }
        h2 {
            text-align: left;
            text-decoration: line-through;
            text-transform: lowercase; /*소문자*/
            }
        h3 {
            text-align: right;
            text-decoration: underline;
            }
    </style>
</head>
<h1>Heading</h1>
<h2>Heading</h2>
<h3>Heading</h3>
<body>
    
</body>
</html>


<!doctype html>
<html>
<head>
    <meta charset = "utf-8" />
    <style type="text/css">
        #d1 {
            font-family: 궁서;        /*글씨 체*/
            font-size: 40px;        /*글씨 사이즈*/
            }
        #d2 {
            font-family: 굴림;
            font-size: 40pp;        /*글씨 사이즈단위는 px와 pp가 있음*/
            }
        #d3 {
            font-style: italic;        /*글자 스타일*/
            font-weight: bold;        /*글씨 굵기*/
            }
    </style>
</head>
<body>
    <div id="d1">Hello CSS</div>
    <div id="d2">Hello CSS</div>
    <div id="d3">Hello CSS</div>
    <div id="d4">Hello CSS</div>
</body>
</html>

**글자에 대한 다양한 기능있음
{text-indent: 50px;}  : 들여쓰기
h1 {letter-spacing: 3px;} : 글짜 간격
...
http://www.w3schools.com/css/css_text.asp

15. list style
<!DOCTYPE html>
<html>
<head>
<style>
    /*리스트 스타일*/
ul.a {    list-style-type: circle;}
ul.b {    list-style-type: square;}
ol.c {    list-style-type: upper-roman;}
ol.d {    list-style-type: lower-alpha;}
</style>
</head>
<body>

<p>Example of unordered lists:</p>
<ul class="a">
  <li>Coffee</li>
  <li>Tea</li>
  <li>Coca Cola</li>
</ul>

<ul class="b">
  <li>Coffee</li>
  <li>Tea</li>
  <li>Coca Cola</li>
</ul>

<p>Example of ordered lists:</p>
<ol class="c">
  <li>Coffee</li>
  <li>Tea</li>
  <li>Coca Cola</li>
</ol>

<ol class="d">
  <li>Coffee</li>
  <li>Tea</li>
  <li>Coca Cola</li>
</ol>

</body>
</html>

<!doctype html>
<html>
<head>
<meta charset = "utf-8" />
<style type="text/css">
    /*리스트 스타일에 이미지를 적용 할 수 있음*/
    ul {list-style-image: url('bullet1.gif');}
</style>
</head>
<body>

<ul>
  <li>Coffee</li>
  <li>Tea</li>
  <li>Coca Cola</li>
</ul>

</body>
</html>

17.border
<!DOCTYPE html>
<html>
<head>
<style>
p.one {
    border-style: solid;
    border-width: 5px;
    /*border-width: medium;*/
}
p.seven {
    border-style: solid;
    border-width: 2px 10px 4px 20px;  /*상하좌우 굵기 다르게 줄 수 있음*/
}
</style>
</head>
<body>
<p class="one">Some text.</p>
<p class="seven">Some text.</p>

<p><b>Note:</b> The "border-width" property does not work if it is used alone.
Always specify the "border-style" property to set the borders first.</p>

</body>
</html>

<!DOCTYPE html>
<html>
<head>
<style>
p {
    border-left: 6px solid red;  /*굵기 종류 색깔을 한줄코드로 적을 수 있음*/
    background-color: lightgrey;
}
</style>
</head>
<body>

<p>border-left-width, border-left-style, and border-left-color.</p>

</body>
</html>


18. margin
<!DOCTYPE html>
<html>
<head>
<style>
div {
    border: 1px solid black;
    margin-top: 100px;            /*margin은 네모박스 밖에 공간을 의미함*/
    margin-bottom: 100px;
    margin-right: 150px;
    margin-left: 80px;
    background-color: lightblue;
}
/*div {
    margin: 100px 150px 100px 80px;
} 줄여쓰기 가능*/
</style>
</head>
<body>

<h2>Using individual margin properties</h2>

<div>top margin of 100px, a right margin of 150px, a bottom margin of 100px, and a left margin of 80px.</div>

</body>
</html>


19. padding
<!DOCTYPE html>
<html>
<head>
<style>
div {
    border: 1px solid black;
    background-color: lightblue;
    padding-top: 50px;          /*padding은 네모상자 안의 공간을 의미함*/
    padding-right: 30px;
    padding-bottom: 50px;
    padding-left: 80px;
}
/*p {
    padding: 50px 30px 50px 80px;
} 줄여쓰기 가능*/
</style>
</head>
<body>

<h2>Using individual padding properties</h2>

<div>This div element has a top padding of 50px, a right padding of 50px, a bottom padding of 50px, and a left padding of 80px.</div>

</body>
</html>
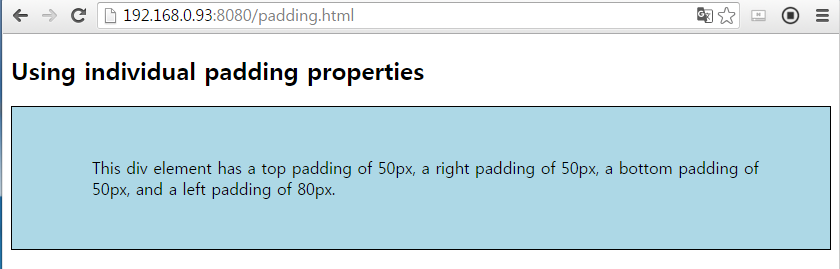

20. max- width 반응성웹을 만들기 위해 최대 넓이를 잼
div {
    max-width: 500px;
    height: 100px;
    background-color: powderblue;
}


21. button
버튼 모양 제작 사이트

  • http://www.cssbuttongenerator.com/

사각형 만들 때 테이블이 아니라 css button으로 만들 수 있음


2016년 7월 18일 월요일

01day HTML & CSS

서버

  • apache + php
  • apache tomcat + jsp  //tomcat은 JDK깔려있다는 전제하에 작동함

클라이언트

  • browser

요청

  • URL

응답

  • HTML


html 공부하기 좋은 싸이트
www.w3schools.com

CSS 싸이트
http://csszengarden.com/

웹프로그램:
디자이너
조각코드 => program
html/css를 잘 알아야지 디자인을 제대로 구현할 수 있음

웹브라우저에서 css제거


1. 아파치 톰캣 세팅
이클립스에서 아파치 톰캣 지원버전 확인
아파치 톰캣 실행폴더위치에서 catalina.bat run 명령
에러나면서 JAVA위치를 물어봄
시스템에서 JAVA_HOME 설정
다시 톰캣을 실행시키면 정상적으로 서버가 열림
로그를 읽어드림
웹브라우저에서 http://localhost:8080/
톰캣 공개폴더 위치
C:\java\apache-tomcat-8.0.36\webapps\ROOT
 test로 HTML 문서만들기
웹에서 확인하기 http://localhost:8080/test.html
http://192.168.0.93:8080/test.html (다른사람 아이피를 치면 다른사람 서버에 접속가능함)
<!doctype html>
<html>
    <head>
        <meta charset = "utf - 8" />
    </head>
    <body>
        Hello HTML 192.168.0.93<br>
    </body>
</html>

2. HTML Forms
고객으로부터 입력을 받아드림

3. HTML 안의 CSS
<!doctype html>
<html>
<head>
    <meta charset = "utf - 8" />
    <style type="text/css">
        body {background: grey}
    </style>
</head>
<body>
    Hello HTML 192.168.0.93<br>
</body>
</html>


4. 모든 HTML 문서에 동일한 CSS적용을 위해 따로 빼둠
/*CSS 파일 만듦 */
body {background: gray}

<!--HTML 파일 -->
<!doctype html>
<html>
<head>
    <meta charset = "utf - 8" />
    <link rel="stylesheet" type="text/css" href="test.css" />
</head>
<body>
    Hello HTML 192.168.0.93<br>
</body>
</html>


2016년 7월 15일 금요일

01day UML & ERD

자바
c++
객체지향적인 프로그램 언어

  • UML(Unified Modeling Language)
    • 종류
      • 클래스 다이어그램
      • 유스케이스 다이어그램
      • 시퀀스 다이어그램
    • 설계 - 완벽(x)
      • 구현 - 확인
    • 실무 - version 확인

데이터베이스
  • ERD

RDB(relation data base)
ODB(object data base)
RODB(relation object data base)

1.  클래스 다이어그램

세탁기(washing machine)의 클래스가 있다고 가정하고 예를 들어보자. 이 클래스의 속성은 브랜드 이름, 모델, 일련 번호, 용량 등이고, 이 클래스의 행동은 옷을 넣는다(accept clothes) , 세제를 뿌린다(accept detergent) , 켜다(turn on) , 끄다(turn off) 등일 것이다.

2. 유스케이스 다이어그램
유스케이스(use case)는 사용자의 입장에서 본 시스템의 행동을 일컫는다

3. 시퀀스 다이어그램
UML 시퀀스(sequence) 다이어그램은 객체들끼리 주고받는 메시지의 순서를 시간의 흐름에 따라 보여주는 그림이다.


4. ERD(Entity-Relationship Diagram)
  • 개체(Entity)
    • 개체는 사각형으로 표현되며, 사각형의 상단에 개체의 이름이 기술된다.
  • 속성(Attribute)
    • 개체의 속성은 사각형 내부에 기술하는데, 사각형의 위 칸에는 기본키 속성을, 아래 칸에는 일반 속성을 기술한다.
  • 관계(Relationship)
    • 관계는 개체 간에 실선 또는 점선으로 표시된다.
5. ExERD 사용하기
**리버스엔지니어링 : 기존의 테이블로 ERD그려줌


2016년 7월 14일 목요일

17day java

Enum : 열거타입

  • 상수값에 대한 저장
  • 요일
    • 월~일 : 겉으로는 문자열을 사용 → 숫자상수로 저장 베이스
  • API : java.util
1

public enum Week {  //클래스를 생성하듯이 Enum생성
 MONDAY,  //숫자값으로 저장된다
 TUESDAY,
 WEDNESDAY,
 THURSDAY,
 FRIDAY,
 SATURDAY,
 SUNDAY
}

import java.util.Calendar;

public class EnumEx01 {

 public static void main(String[] args) {
  Week today = null;  //week 는 enum 타입
  Calendar cal = Calendar.getInstance();
  
  int week = cal.get(Calendar.DAY_OF_WEEK);
  switch(week){
  case 1:
   today = Week.SUNDAY;
   break;
  case 2:
   today = Week.MONDAY;
   break;
  case 3:
   today = Week.TUESDAY;
   break;
  case 4:
   today = Week.WEDNESDAY;
   break;
  case 5:
   today = Week.THURSDAY;
   break;
  case 6:
   today = Week.FRIDAY;
   break;
  case 7:
   today = Week.SATURDAY;
   break;
  }
  
  System.out.println("오늘 요일: " + today);
  if(today.equals("THURSDAY")){               //ENUM의 비교는 문자로 하는 것이 아님
   System.out.println("목요일 입니다.");
  }else{
   System.out.println("목요일이 아닙니다.");
  }
  
  if(today == Week.THURSDAY){              //ENUM의 비교
   System.out.println("목요일 입니다.");
  }else{
   System.out.println("목요일이 아닙니다.");
  }
  
 }

}


2

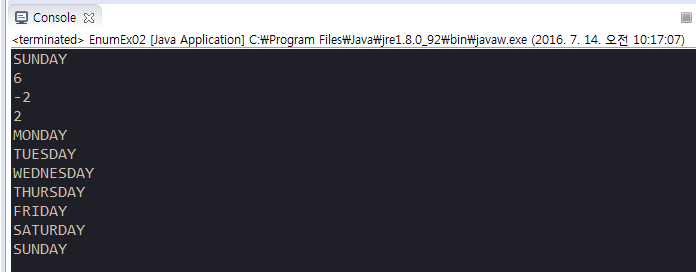
public class EnumEx02 {

 public static void main(String[] args) {

  //name()
  Week today = Week.SUNDAY;
  
  String name = today.name();  //문자를 가져옴
  System.out.println(name);
  
  //ordinal()
  int ordinal = today.ordinal();  //상수 값을 순번을 가져옴 0번부터 시작함
  System.out.println(ordinal);
  
  //순서 비교
  Week day1 = Week.MONDAY;
  Week day2 = Week.WEDNESDAY;
  
  int result1 = day1.compareTo(day2);
  int result2 = day2.compareTo(day1);
  System.out.println(result1);
  System.out.println(result2);
  
  //values() 
  Week[] days = Week.values();
  for(Week day: days){          //enum의 모든 값 가져오기
   System.out.println(day);
  }
 }

}


3
람다식

  • 메서드의 호출을 간결하게 생성한 식
  • 현대 언어의 기본
    • c# ~swift 에서는 람다식이 존재함
    • java(x) → java 8 (o) : 자바에서는 8 부터 생김
      • 오라클사에서 현대적인 언어로 변화를 시도 (sun → oracle : 자바 8)
        • 람다식, Stream API, ...
        • Stream - 고용량 데이터 처리 MapReduce 제공함
@FunctionalInterface  //어노테이션 //람다식을 쓴다는 표시 //메소드를 2개 선언하면 에러생김
public interface MyFucntionalInterface {
 //람다식을 사용하기 위한 인터페이스는 메소드르 하나만 포함함
 public void method1();
 //public void method2();
}


public class MyFunctionalIterfaceMain {

 public static void main(String[] args) {
  //기존의 인터페이스 실행방법
  MyFucntionalInterface f1 = new MyFucntionalInterface() {
   @Override
   public void method1() {
    System.out.println("call Mathod1()");
   }
  };
  
  f1.method1();
  //람다식 //코드가 짧아짐
  MyFucntionalInterface f2 = () -> {
   System.out.println("call Method1() lambda");
  };
  f2.method1();
  
  //실행문 하나일때 괄호 생략가능
  MyFucntionalInterface f3 = () -> System.out.println("call Method1() lambda");
  ;
  f3.method1();
 }

}


4
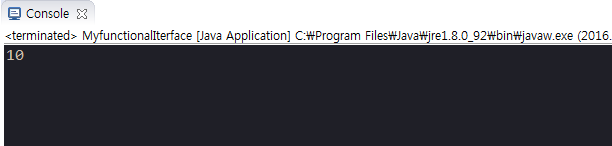
@FunctionalInterface
public interface MyfunctionalInterface {
 //매개변수가 있는 인터페이스
 public void method(int x);
}


public class MyfunctionalIterface {

 public static void main(String[] args) {
  //매개변수가 있는 람다식
  MyfunctionalInterface f1;
  f1 = (x) -> {
   int result = x*5;
   System.out.println(result);
  };
  
  f1.method(2);
 }

}


5
@FunctionalInterface
public interface MyfunctionalInterface {
 //리턴값이 있는 인터페이스
 public int method(int x, int y);
}


public class MyfunctionalIterface {

 public static void main(String[] args) {
  //매개변수가 있는 람다식
  MyfunctionalInterface f1;
  f1 = (x,y)-> {
   //int result = x*y;
   //return result;
   return x*y;
  };
  
  int result = f1.method(10, 20);
  System.out.println(result);
  
  MyfunctionalInterface f2;
  f2 = (x,y) -> x*y;
  int result1 = f2.method(10, 20);
  System.out.println(result1);
  
 }

}


6

public class MainEx01 {

    public static void main(String[] args) {
        // 쓰레드 Runnable 인터페이스 기존방식
        Runnable r1 = new Runnable() {
            
            @Override
            public void run() {
                for(int i =0; i<10; i++){
                    System.out.println(i);
                }
            }
        };
        
        //람다방식으로 Runnable 구현
        Runnable r2 = () -> {
            for(int i=0;i<10;i++){
                System.out.println(i+"lambda");
            }
        };
        
        
        Thread t1 = new Thread(r1);
        Thread t2 = new Thread(r2);
        t1.start();
        t2.start();
    }

}


7
외부 데이터

  • web -URLConnection
  • sms - 무료x
  • mail - 
    • 자바 → 메일서버 → 메일 전송
      • 일반적으로 스팸을 방지하기 위해 메일서버 개방 x
      • 구글메일서버 개방되어있음
      • 권한 허용 필요
        • https://www.google.com/settings/security/lesssecureapps
      • 자바에 메일 라이브러리 설치 필요함
      • 인증클래스 생성 필요함


//인증클래스 생성
import javax.mail.Authenticator;
import javax.mail.PasswordAuthentication;

public class MyAuth extends Authenticator {
 private String fromEmail;
 private String password;
 
 //생성자
 public MyAuth(String fromEmail, String password) {
  this.fromEmail = fromEmail;
  this.password = password;
 }
 
 @Override
 protected PasswordAuthentication getPasswordAuthentication() {
  // TODO Auto-generated method stub
  return new PasswordAuthentication(fromEmail, password);
 }
 
}

import java.io.UnsupportedEncodingException;
import java.util.Properties;

import javax.mail.Message;
import javax.mail.MessagingException;
import javax.mail.Session;
import javax.mail.Transport;
import javax.mail.internet.InternetAddress;
import javax.mail.internet.MimeMessage;

public class MailSender {
 private String fromEmail = "classic.what@gmail.com";
 private String password = "패스워드";
 
 
 public static void main(String[] args) {
  String toEmail = "classic.what@gamil.com";
  String fromName = "보내는사람은 나다";
  String subject = "제목이다";
  String content = "내용이다";
  
  MailSender mail = new MailSender();
  mail.sendMail(toEmail, fromName, subject, content);
 }
 
 public void sendMail(String toEmail, String fromName, String subject, String content){
  try {
   //메일서버 접속을 위한 환경 설정 Properties  //gmail에서 제공해줌
   Properties props = new Properties();
   props.put("mail.smtp.starttls.enable", "true");  
   props.put("mail.transport.protocol", "stmp"); //stmp 단순메일전송규약
   props.put("mail.smtp.host", "smtp.gmail.com"); //gmail 서버를 통해서 보냄
   props.put("mail.smtp.socketFactory.class", "javax.net.ssl.SSLSocketFactory");
   props.put("mail.smtp.port", "465"); //gmail 포트번호
   props.put("mail.smtp.auth", "true");
   
   MyAuth auth = new MyAuth(fromEmail,password);
   Session sess = Session.getDefaultInstance(props,auth);  //세션은 접속상태 //아이디 패스워드클래스를 만들어 세션에 가져감
   
   // 메시지 
   MimeMessage msg = new MimeMessage(sess);
   msg.setHeader("content-type", "text/plain; charset=utf-8"); //전체데이터 규정
   msg.addRecipient(Message.RecipientType.TO, new InternetAddress(toEmail,fromName,"utf-8")); //보내는사람
   msg.setSubject(subject); //제목
   msg.setContent(content,"text/plain; charset=utf-8"); //내용
   msg.setSentDate(new java.util.Date()); //보내는 시간
   
   Transport.send(msg);
   
   System.out.println("메일 전송이 완료되었습니다.");
  } catch (UnsupportedEncodingException e) {
   // TODO Auto-generated catch block
   e.printStackTrace();
  } catch (MessagingException e) {
   // TODO Auto-generated catch block
   e.printStackTrace();
  }
 }
}


8
import java.io.File;
import java.io.UnsupportedEncodingException;
import java.util.Properties;

import javax.activation.DataHandler;
import javax.activation.DataSource;
import javax.activation.FileDataSource;
import javax.mail.BodyPart;
import javax.mail.Message;
import javax.mail.MessagingException;
import javax.mail.Multipart;
import javax.mail.Session;
import javax.mail.Transport;
import javax.mail.internet.InternetAddress;
import javax.mail.internet.MimeBodyPart;
import javax.mail.internet.MimeMessage;
import javax.mail.internet.MimeMultipart;

public class MailSender {
    private String fromEmail = "classic.what@gmail.com";
    private String password = "비밀번호";
    
    
    public static void main(String[] args) {
        String toEmail = "classic.what@gamil.com";
        String fromName = "보내는사람은 나다";
        String subject = "제목이다";
        //html 형식으로 보내도 됨  //이미지 소스코드로 이미지 출력가능함
        String content = "<html><head></head><body><font color='red'>내용이다</font><img src='http://img.naver.net/static/www/u/2013/0731/nmms_224940510.gif'></body></html>";
        
        MailSender mail = new MailSender();
        mail.sendMail(toEmail, fromName, subject, content);
    }
    
    public void sendMail(String toEmail, String fromName, String subject, String content){
        try {
            Properties props = new Properties();
            props.put("mail.smtp.starttls.enable", "true");  
            props.put("mail.transport.protocol", "stmp"); 
            props.put("mail.smtp.host", "smtp.gmail.com"); 
            props.put("mail.smtp.socketFactory.class", "javax.net.ssl.SSLSocketFactory");
            props.put("mail.smtp.port", "465"); 
            props.put("mail.smtp.auth", "true");
            
            MyAuth auth = new MyAuth(fromEmail,password);
            Session sess = Session.getDefaultInstance(props,auth);
            
            // 메시지 
            MimeMessage msg = new MimeMessage(sess);
            msg.setHeader("content-type", "text/plain; charset=utf-8");
            msg.addRecipient(Message.RecipientType.TO, new InternetAddress(toEmail,fromName,"utf-8")); 
            msg.setSubject(subject);
            //msg.setContent(content,"text/html; charset=utf-8"); //내용형식 html로 바꿔줌
            msg.setSentDate(new java.util.Date());
            
            
            // 내용 + 첨부파일
            Multipart multipart = new MimeMultipart();
            MimeBodyPart bodyPart = new MimeBodyPart();
            bodyPart.setText("테스트용 메일입니다","utf-8");
            multipart.addBodyPart(bodyPart);
            
            bodyPart = new MimeBodyPart();
            FileDataSource fds = new FileDataSource(new File("C:/java/workspace/MailEx/src/MyAuth.java"));
            bodyPart.setDataHandler(new DataHandler(fds));
            bodyPart.setFileName(fds.getName());
            multipart.addBodyPart(bodyPart);
            
            msg.setContent(multipart);
            
            //전송
            Transport.send(msg);
            
            System.out.println("메일 전송이 완료되었습니다.");
        } catch (UnsupportedEncodingException e) {
            // TODO Auto-generated catch block
            e.printStackTrace();
        } catch (MessagingException e) {
            // TODO Auto-generated catch block
            e.printStackTrace();
        }
    }
}


9. 메일보내기 GUI만들기
//인증클래스 생성
import javax.mail.Authenticator;
import javax.mail.PasswordAuthentication;

public class MyAuth extends Authenticator {
 private String fromEmail;
 private String password;
 
 //생성자
 public MyAuth(String fromEmail, String password) {
  this.fromEmail = fromEmail;
  this.password = password;
 }
 
 @Override
 protected PasswordAuthentication getPasswordAuthentication() {
  // TODO Auto-generated method stub
  return new PasswordAuthentication(fromEmail, password);
 }
 
}

import java.awt.BorderLayout;
import java.awt.Desktop;
import java.awt.EventQueue;

import javax.swing.JFrame;
import javax.swing.JPanel;
import javax.swing.border.EmptyBorder;
import javax.swing.JLabel;
import javax.swing.JTextField;
import javax.swing.JButton;
import javax.swing.JFileChooser;
import javax.swing.JRadioButton;
import javax.swing.JTextArea;
import javax.activation.DataHandler;
import javax.activation.FileDataSource;
import javax.mail.Message;
import javax.mail.MessagingException;
import javax.mail.Multipart;
import javax.mail.Session;
import javax.mail.Transport;
import javax.mail.internet.InternetAddress;
import javax.mail.internet.MimeBodyPart;
import javax.mail.internet.MimeMessage;
import javax.mail.internet.MimeMultipart;
import javax.swing.ButtonGroup;
import java.awt.event.MouseAdapter;
import java.awt.event.MouseEvent;
import java.io.BufferedWriter;
import java.io.File;
import java.io.FileWriter;
import java.io.IOException;
import java.io.UnsupportedEncodingException;
import java.util.Properties;
import javax.swing.JScrollPane;

public class MailSender extends JFrame {

    private JPanel contentPane;
    private JTextField textField;
    private JTextField textField_1;
    private JLabel label_1;
    private JTextField textField_2;
    private JTextArea textArea;
    private JButton btnNewButton;
    private JButton btnNewButton_1;
    private final ButtonGroup buttonGroup = new ButtonGroup();
    private JRadioButton rdbtnText;
    private JRadioButton rdbtnHtml;
    
    private String fromEmail = "classic.what@gmail.com";
    private String password = "비밀번호";
    private JScrollPane scrollPane;
    private JButton btnHtml;

    /**
     * Launch the application.
     */
    public static void main(String[] args) {
        EventQueue.invokeLater(new Runnable() {
            public void run() {
                try {
                    MailSender frame = new MailSender();
                    frame.setVisible(true);
                } catch (Exception e) {
                    e.printStackTrace();
                }
            }
        });
    }

    /**
     * Create the frame.
     */
    public MailSender() {
        setDefaultCloseOperation(JFrame.EXIT_ON_CLOSE);
        setBounds(100, 100, 486, 349);
        contentPane = new JPanel();
        contentPane.setBorder(new EmptyBorder(5, 5, 5, 5));
        setContentPane(contentPane);
        contentPane.setLayout(null);
        
        JLabel lblNewLabel = new JLabel("받는사람");
        lblNewLabel.setBounds(11, 10, 57, 15);
        contentPane.add(lblNewLabel);
        
        textField = new JTextField();
        textField.setBounds(80, 7, 377, 21);
        contentPane.add(textField);
        textField.setColumns(10);
        
        JLabel label = new JLabel("제목");
        label.setBounds(11, 41, 57, 15);
        contentPane.add(label);
        
        textField_1 = new JTextField();
        textField_1.setColumns(10);
        textField_1.setBounds(80, 38, 377, 21);
        contentPane.add(textField_1);
        
        label_1 = new JLabel("첨부");
        label_1.setBounds(12, 248, 57, 15);
        contentPane.add(label_1);
        
        textField_2 = new JTextField();
        textField_2.setColumns(10);
        textField_2.setBounds(81, 245, 261, 21);
        contentPane.add(textField_2);
        
        JLabel label_2 = new JLabel("형식");
        label_2.setBounds(11, 73, 57, 15);
        contentPane.add(label_2);
        
        rdbtnText = new JRadioButton("Text");
        rdbtnText.setSelected(true);
        buttonGroup.add(rdbtnText);
        rdbtnText.setBounds(80, 69, 121, 23);
        contentPane.add(rdbtnText);
        
        rdbtnHtml = new JRadioButton("HTML");
        buttonGroup.add(rdbtnHtml);
        rdbtnHtml.setBounds(220, 69, 90, 23);
        contentPane.add(rdbtnHtml);
        
        JLabel label_3 = new JLabel("내용");
        label_3.setBounds(11, 98, 57, 15);
        contentPane.add(label_3);
        
        scrollPane = new JScrollPane();
        scrollPane.setBounds(80, 98, 378, 137);
        contentPane.add(scrollPane);
        
        textArea = new JTextArea();
        scrollPane.setViewportView(textArea);
        
        btnNewButton = new JButton("첨부파일");
        btnNewButton.addMouseListener(new MouseAdapter() {
            @Override
            public void mouseClicked(MouseEvent arg0) {
                //첨부 파일선택기
                JFileChooser fileChooser = new JFileChooser("c:\\");
                int result = fileChooser.showOpenDialog(MailSender.this);
                if(result == JFileChooser.APPROVE_OPTION){
                    //파일경로를 텍스트 필드에 전달
                    textField_2.setText(fileChooser.getSelectedFile().getAbsolutePath());
                }else{
                    System.out.println("X");
                }
                
            }
        });
        btnNewButton.setBounds(361, 245, 97, 23);
        contentPane.add(btnNewButton);
        
        btnNewButton_1 = new JButton("전송");
        btnNewButton_1.addMouseListener(new MouseAdapter() {
            @Override
            public void mouseClicked(MouseEvent e) {
                
                //보낼주소 받기
                String toEmail = textField.getText();
                //제목 받기
                String subject = textField_1.getText();
                //형식 받기
                String format = "";
                if(rdbtnText.isSelected()){  //라디오버튼 체크되어있으면 메일보낼 형식 format에 넣음
                 format = "plain";
                }else if(rdbtnHtml.isSelected()){
                 format = "html";
                }
                //내용받기
                String content = textArea.getText();
                //첨부파일주소 받기
                String addFile = textField_2.getText();
                //메일보내기
                MailSender mail = new MailSender();
                if(!toEmail.equals("")){ //메일주소값이 있어야지 메일 보냄
                    mail.sendMail(toEmail, "홍길동", subject, content, format, addFile);
                }
                dispose(); //보낸 뒤에 창 닫기
            }
        });
        btnNewButton_1.setBounds(361, 278, 97, 23);
        contentPane.add(btnNewButton_1);
        
        btnHtml = new JButton("HTML 미리보기");
        btnHtml.addMouseListener(new MouseAdapter() {
            @Override
            public void mouseClicked(MouseEvent e) {
                //html 내용 가져오기
                String htmlcont = textArea.getText();
                //html 파일 생성
                BufferedWriter bw = null;
                  try {
                   bw = new BufferedWriter(new FileWriter("c:/java/htmlcont.html"));
                   
                   bw.write(htmlcont);
                   
                   System.out.println("출력완료");
                  } catch (IOException e1) {
                   e1.printStackTrace();
                  } finally {
                   if(bw != null) try{ bw.close();} catch(IOException e1){}
                  }
                 //html 파일 열기
                  try {
                        File file = new File("c:/java/htmlcont.html");
                        Desktop desktop = Desktop.getDesktop();
                        desktop.open(file);
                    } catch (IOException e1) {
                        // TODO Auto-generated catch block
                        e1.printStackTrace();
                    }
                  
            }
        });
        btnHtml.setBounds(336, 69, 121, 23);
        contentPane.add(btnHtml);
        
    }
    
    //메일보내기 메서드
    public void sendMail(String toEmail, String fromName, String subject, String content, String format, String addFile){
        try {
            Properties props = new Properties();
            props.put("mail.smtp.starttls.enable", "true");  
            props.put("mail.transport.protocol", "stmp"); 
            props.put("mail.smtp.host", "smtp.gmail.com"); 
            props.put("mail.smtp.socketFactory.class", "javax.net.ssl.SSLSocketFactory");
            props.put("mail.smtp.port", "465"); 
            props.put("mail.smtp.auth", "true");
            
            MyAuth auth = new MyAuth(fromEmail,password);
            Session sess = Session.getDefaultInstance(props,auth);
            
            // 메시지 
            MimeMessage msg = new MimeMessage(sess);
            msg.setHeader("content-type", "text/plain; charset=utf-8");
            msg.addRecipient(Message.RecipientType.TO, new InternetAddress(toEmail,fromName,"utf-8")); 
            msg.setSubject(subject);
            msg.setSentDate(new java.util.Date());
            
            // 내용
            Multipart multipart = new MimeMultipart();
            MimeBodyPart bodyPart = new MimeBodyPart();
            bodyPart.setContent(content,"text/"+format+"; charset=utf-8");
            multipart.addBodyPart(bodyPart);
            //첨부파일
            if(!addFile.equals("")){ //첨부파일이 있을경우만 첨부파일 보내기
            bodyPart = new MimeBodyPart();
            FileDataSource fds = new FileDataSource(new File(addFile));
            bodyPart.setDataHandler(new DataHandler(fds));
            bodyPart.setFileName(fds.getName());
            multipart.addBodyPart(bodyPart);
            }
            msg.setContent(multipart);
            
            //전송
            Transport.send(msg);
            
            System.out.println("메일 전송이 완료되었습니다.");
        } catch (UnsupportedEncodingException e) {
            // TODO Auto-generated catch block
            e.printStackTrace();
        } catch (MessagingException e) {
            // TODO Auto-generated catch block
            e.printStackTrace();
        }
    }
}


2016년 7월 13일 수요일

01day MySQL

MySQL

  • community 버전 (무료)
  • enterprise 버전 (유료)
MySQL workbench
  • GUI
  • ERD model을 제공함


*Oracle ERD tool

  • ERWin (유료)
  • ko.exerd.com (교육용 무료)

프로젝트 진행을 위한 기본문서
  • UML
  • ERD
 1.
MySQL 실행
MySQL workbench 실행
ERD model

2.
--MySQL은 사용자안에 데이터베이스 폴더가 있어서 데이터베이스를 선택해야지 테이블을 볼 수 있음
mysql> show databases;
mysql> use sakila
mysql> show tables;


 --mysql은 limit로 출력갯수를 제한 할 수 있다
mysql> desc actor;
mysql> select * from actor limit 0, 5;


3. JDBC MySQL 연결
MySQL driver 복사

import java.sql.Connection;
import java.sql.DriverManager;
import java.sql.ResultSet;
import java.sql.SQLException;
import java.sql.Statement;

public class MySQLEx01 {

 public static void main(String[] args) {
  // TODO Auto-generated method stub
  String url = "jdbc:mysql://localhost:3306/sakila?useSSL=false"; //경고창 사용하지 않음
  String user = "root";
  String password = "1234";
  
  Connection conn = null;
  Statement stmt = null;
  ResultSet rs = null;
  
  try {
   Class.forName("com.mysql.jdbc.Driver");
   conn = DriverManager.getConnection(url,user,password);
   
   stmt = conn.createStatement();
   String sql = "select * from actor limit 0,10";
   rs = stmt.executeQuery(sql);
   while(rs.next()){
      String actor_id = rs.getString("actor_id"); 
      String first_name = rs.getString("first_name");
      String last_name = rs.getString("last_name");
      String last_update = rs.getString("last_update");
        
      System.out.printf("%s\t%s\t%s\t%s\n",actor_id, first_name, last_name, last_update);
   }
  } catch (ClassNotFoundException e) {
   // TODO Auto-generated catch block
   e.printStackTrace();
  } catch (SQLException e) {
   // TODO Auto-generated catch block
   e.printStackTrace();
  } finally{
   if(rs != null) try { rs.close(); } catch(SQLException e){}
   if(stmt != null) try { stmt.close(); } catch(SQLException e){}
   if(conn != null) try { conn.close(); } catch(SQLException e){}
  }
  
 }

}

4. MySQL 종료
서버이기 때문에 시스템 자원을 많이 이용, 사용하지 않으면 끄는게 좋음