<!doctype html>
<html>
<head>
    <meta charset = "utf - 8" />
    <style type="text/css">
    /*주석*/
    /*element(tag) select */
    /*{속성, 값}, ; 값의 구분    */
    /*color : foreground => 글자색*/
    /*background => 배경색*/
    p {color: red; background: blue;}
    div {color: blue;}
    </style>
</head>
<body>
    <p>Hello css1</p>
    <div>middlle</div>
    <p>Hello css1</p>
    <div>middlle</div>
    <p>Hello css1</p>
    <div>middlle</div>
</body>
</html>
2. class selector
<!doctype html>
<html>
<head>
    <meta charset = "utf - 8" />
    <style type="text/css">
    .p1 {color: red;}
    .p2 {color: blue;}
    .p3 {color: green;}
    </style>
</head>
<body>
    <p class = "p1">Hello css1</p>
    <div class = "p1">middlle</div>
    <p class = "p2">Hello css1</p>
    <div class = "p2">middlle</div>
    <p class = "p3">Hello css1</p>
    <div class = "p3">middlle</div>
</body>
</html>
<!doctype html>
<html>
<head>
<meta charset = "utf - 8" />
<style type="text/css">
/*.p1 {color: red;}
.p2 {color: blue;}
.p3 {color: green;}*/
/*p태그중에 p1태그를 구분하고 싶을때*/
p.p1 {color: red;}
div.p1 {color: blue;}
</style>
</head>
<body>
<p class = "p1">Hello css1</p>
<div class = "p1">middlle</div>
<p class = "p2">Hello css1</p>
<div class = "p2">middlle</div>
<p class = "p3">Hello css1</p>
<div class = "p3">middlle</div>
</body>
</html>3. id selector
<!doctype html>
<html>
<head>
    <meta charset = "utf - 8" />
    <style type="text/css">
    /*정확히 하나의 태그에 접근할 때 id Selector*/
    #i1 {color: red;}
    #i3 {color: blue;}
    #i5 {color: green;}
    </style>
</head>
<body>
    <p id = "i1">Hello css1</p>
    <div id = "i2">middlle</div>
    <p id = "i3">Hello css1</p>
    <div id = "i4">middlle</div>
    <p id = "i5">Hello css1</p>
    <div id = "i6">middlle</div>
</body>
</html>
4
<!doctype html>
<html>
<head>
    <meta charset = "utf - 8" />
    <style type="text/css">
    /*공통적인 적용일 때 grouping Selector*/
    #i1, #i2, #i3 {color: blue;}
    </style>
</head>
<body>
    <p id = "i1">Hello css1</p>
    <div id = "i2">middlle</div>
    <p id = "i3">Hello css1</p>
    <div id = "i4">middlle</div>
    <p id = "i5">Hello css1</p>
    <div id = "i6">middlle</div>
</body>
</html>
5. decendent selector
<!doctype html>
<html>
<head>
    <meta charset = "utf - 8" />
    <style type="text/css">
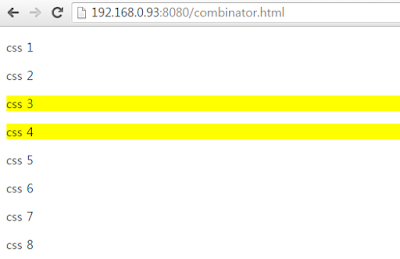
    div p {background: yellow;} /*자손 모두를 선택*/
    /*div > p {background: yellow;}*/

    </style>
</head>
<body>
    <p>css 1</p>
    <p>css 2</p>

    <div>
        <p>css 3</p>
        <p>css 4</p>
        <span>
            <p>css 5</p>
            <p>css 6</p>
        </span>
    </div>

    <p>css 7</p>
    <p>css 8</p>
</body>
</html>
6. child selector
<!doctype html>
<html>
<head>
    <meta charset = "utf - 8" />
    <style type="text/css">
    /*div p {background: yellow;}*/
    div > p {background: yellow;} /*직접 자식 선택*/

    </style>
</head>
<body>
    <p>css 1</p>
    <p>css 2</p>

    <div>
        <p>css 3</p>
        <p>css 4</p>
        <span>
            <p>css 5</p>
            <p>css 6</p>
        </span>
    </div>

    <p>css 7</p>
    <p>css 8</p>
</body>
</html>
7. Adjacent Sibling Selector
<!doctype html>
<html>
<head>
    <meta charset = "utf - 8" />
    <style type="text/css">
    div + p {background: yellow;} /*가장 가까운 형제 하나 선택*/
    /*div ~ p {background: yellow;}*/
    </style>
</head>
<body>
    <p>css 1</p>
    <p>css 2</p>

    <div>
        <p>css 3</p>
        <p>css 4</p>
        <span>
            <p>css 5</p>
            <p>css 6</p>
        </span>
    </div>

    <p>css 7</p>
    <p>css 8</p>
</body>
</html>
8. General Sibling Selector
<!doctype html>
<html>
<head>
    <meta charset = "utf - 8" />
    <style type="text/css">
    /*div + p {background: yellow;}*/
    div ~ p {background: yellow;} /*형제 선택*/
    </style>
</head>
<body>
    <p>css 1</p>
    <p>css 2</p>

    <div>
        <p>css 3</p>
        <p>css 4</p>
        <span>
            <p>css 5</p>
            <p>css 6</p>
        </span>
    </div>

    <p>css 7</p>
    <p>css 8</p>
</body>
</html>
9. pseudo_classes
<!doctype html>
<html>
<head>
    <meta charset = "utf-8" />
    <style type="text/css">
        a:link {color: #ff0000;} /*링크가 걸려있을 때 색깔*/
        a:visited {color: #00ff00;} /*방분 했을 때*/
        a:hover {color: #ff00ff;} /*마우스를 올렸을 때*/
        a:active {color: #0000ff;} /*마우스를 클릭하고있는 상태일 때*/
    </style>
</head>
<body>
    <a href="http://m.naver.com">모바일 네이버</a>
</body>
</html>
10.pseudo_classes
<!doctype html>
<html>
<head>
    <meta charset = "utf-8" />
    <style type="text/css">
        p:first-child {background: yellow;} /*p태그의 첫번째 자식*/
        p:last-child {background: red;} /*p태그의 마지막 자식*/
        p:nth-child(3) {background: blue;} /*p태그의 n번쨰 자식*/
        p:nth-child(2n) {background: pink;} /*p태그의 수열(2n)번쨰 자식*/
    </style>
</head>
<body>
    <p>Hello CSS</p>
    <p>Hello CSS</p>
    <p>Hello CSS</p>
    <p>Hello CSS</p>
    <p>Hello CSS</p>
    <p>Hello CSS</p>
    <p>Hello CSS</p>
</body>
</html>
11. CSS colors
색상값을 주는 법 3가지
- a valid color name - like "red"
- an RGB value - like "rgb(255, 0, 0)"
- a HEX value - like "#ff0000"
12. background
<!doctype html>
<html>
<head>
    <meta charset = "utf-8" />
    <style type="text/css">
        body {background-image: url('background.gif');} /*배경이미지의 기본은 반복*/
    </style>
</head>
<body>

</body>
</html>
<!doctype html>
<html>
<head>
<meta charset = "utf-8" />
<style type="text/css">
/*배경은 table, tr, td 등등에도 적용이 가능함*/
tr:first-child {background-image: url('background.gif');}
</style>
</head>
<body>
<table width="700" height="300" border="1">
<tr>
<td>내용</td>
<td>내용</td>
<td>내용</td>
</tr>
<tr>
<td>내용</td>
<td>내용</td>
<td>내용</td>
</tr>
</table>
</body>
</html><!doctype html>
<html>
<head>
<meta charset = "utf-8" />
<style type="text/css">
/*배경은 table, tr, td 등등에도 적용이 가능함*/
table {
background-image: url('background.gif');
/*background-repeat: repeat-y; y축으로만 반복*/
background-repeat: no-repeat; /*반복안함*/
background-position: right top; /*이미지 위치지정*/
}
</style>
</head>
<body>
<table width="700" height="300" border="1">
<tr>
<td>내용</td>
<td>내용</td>
<td>내용</td>
</tr>
<tr>
<td>내용</td>
<td>내용</td>
<td>내용</td>
</tr>
</table>
</body>
</html>13. attribute selector
<!doctype html>
<html>
<head>
    <meta charset = "utf-8" />
    <style type="text/css">
        /*태그의 속성을 선택함 attribute selector*/
        a[target=_blank] {background: yellow;}
    </style>
</head>
<body>
    <a href="http://m.naver.com">네이버</a><br />
    <a href="http://m.naver.com" target="_blank">네이버</a><br />
    <a href="http://m.naver.com" target="_top">네이버</a><br />
</body>
</html>
**정규표현식 처럼 문자 일부를 가지고 찾을 수 있는 기능이 있음
[title~="flower"] : 해당 단어를 정확히 포함 (flowers,new-flower [x])
[class^="top"] : 속성값이 해당 단어로 시작
...
http://www.w3schools.com/css/css_attribute_selectors.asp
14. text
<!doctype html>
<html>
<head>
    <meta charset = "utf-8" />
    <style type="text/css">
        h1 {
            text-align: center;   /*정렬*/
            text-decoration: overline; /*강조 라인*/
            text-transform: uppercase; /* 대문자 */
            }
        h2 {
            text-align: left;
            text-decoration: line-through;
            text-transform: lowercase; /*소문자*/
            }
        h3 {
            text-align: right;
            text-decoration: underline;
            }
    </style>
</head>
<h1>Heading</h1>
<h2>Heading</h2>
<h3>Heading</h3>
<body>

</body>
</html>
<!doctype html>
<html>
<head>
<meta charset = "utf-8" />
<style type="text/css">
#d1 {
font-family: 궁서; /*글씨 체*/
font-size: 40px; /*글씨 사이즈*/
}
#d2 {
font-family: 굴림;
font-size: 40pp; /*글씨 사이즈단위는 px와 pp가 있음*/
}
#d3 {
font-style: italic; /*글자 스타일*/
font-weight: bold; /*글씨 굵기*/
}
</style>
</head>
<body>
<div id="d1">Hello CSS</div>
<div id="d2">Hello CSS</div>
<div id="d3">Hello CSS</div>
<div id="d4">Hello CSS</div>
</body>
</html>**글자에 대한 다양한 기능있음
p {text-indent: 50px;} : 들여쓰기
h1 {letter-spacing: 3px;} : 글짜 간격
...
http://www.w3schools.com/css/css_text.asp
15. list style
<!DOCTYPE html>
<html>
<head>
<style>
    /*리스트 스타일*/
ul.a {    list-style-type: circle;}
ul.b {    list-style-type: square;}
ol.c {    list-style-type: upper-roman;}
ol.d {    list-style-type: lower-alpha;}
</style>
</head>
<body>

<p>Example of unordered lists:</p>
<ul class="a">
  <li>Coffee</li>
  <li>Tea</li>
  <li>Coca Cola</li>
</ul>

<ul class="b">
  <li>Coffee</li>
  <li>Tea</li>
  <li>Coca Cola</li>
</ul>

<p>Example of ordered lists:</p>
<ol class="c">
  <li>Coffee</li>
  <li>Tea</li>
  <li>Coca Cola</li>
</ol>

<ol class="d">
  <li>Coffee</li>
  <li>Tea</li>
  <li>Coca Cola</li>
</ol>

</body>
</html>
<!doctype html>
<html>
<head>
<meta charset = "utf-8" />
<style type="text/css">
/*리스트 스타일에 이미지를 적용 할 수 있음*/
ul {list-style-image: url('bullet1.gif');}
</style>
</head>
<body>
<ul>
<li>Coffee</li>
<li>Tea</li>
<li>Coca Cola</li>
</ul>
</body>
</html>17.border
<!DOCTYPE html>
<html>
<head>
<style>
p.one {
    border-style: solid;
    border-width: 5px;
    /*border-width: medium;*/
}
p.seven {
    border-style: solid;
    border-width: 2px 10px 4px 20px;  /*상하좌우 굵기 다르게 줄 수 있음*/
}
</style>
</head>
<body>
<p class="one">Some text.</p>
<p class="seven">Some text.</p>

<p><b>Note:</b> The "border-width" property does not work if it is used alone.
Always specify the "border-style" property to set the borders first.</p>

</body>
</html>
<!DOCTYPE html>
<html>
<head>
<style>
p {
border-left: 6px solid red; /*굵기 종류 색깔을 한줄코드로 적을 수 있음*/
background-color: lightgrey;
}
</style>
</head>
<body>
<p>border-left-width, border-left-style, and border-left-color.</p>
</body>
</html>18. margin
<!DOCTYPE html>
<html>
<head>
<style>
div {
    border: 1px solid black;
    margin-top: 100px;            /*margin은 네모박스 밖에 공간을 의미함*/
    margin-bottom: 100px;
    margin-right: 150px;
    margin-left: 80px;
    background-color: lightblue;
}
/*div {
    margin: 100px 150px 100px 80px;
} 줄여쓰기 가능*/
</style>
</head>
<body>

<h2>Using individual margin properties</h2>

<div>top margin of 100px, a right margin of 150px, a bottom margin of 100px, and a left margin of 80px.</div>

</body>
</html>
19. padding
<!DOCTYPE html>
<html>
<head>
<style>
div {
    border: 1px solid black;
    background-color: lightblue;
    padding-top: 50px;          /*padding은 네모상자 안의 공간을 의미함*/
    padding-right: 30px;
    padding-bottom: 50px;
    padding-left: 80px;
}
/*p {
    padding: 50px 30px 50px 80px;
} 줄여쓰기 가능*/
</style>
</head>
<body>

<h2>Using individual padding properties</h2>

<div>This div element has a top padding of 50px, a right padding of 50px, a bottom padding of 50px, and a left padding of 80px.</div>

</body>
</html>
20. max- width 반응성웹을 만들기 위해 최대 넓이를 잼
div {
    max-width: 500px;
    height: 100px;
    background-color: powderblue;
}
21. button
버튼 모양 제작 사이트
- http://www.cssbuttongenerator.com/
사각형 만들 때 테이블이 아니라 css button으로 만들 수 있음


댓글 없음:
댓글 쓰기